
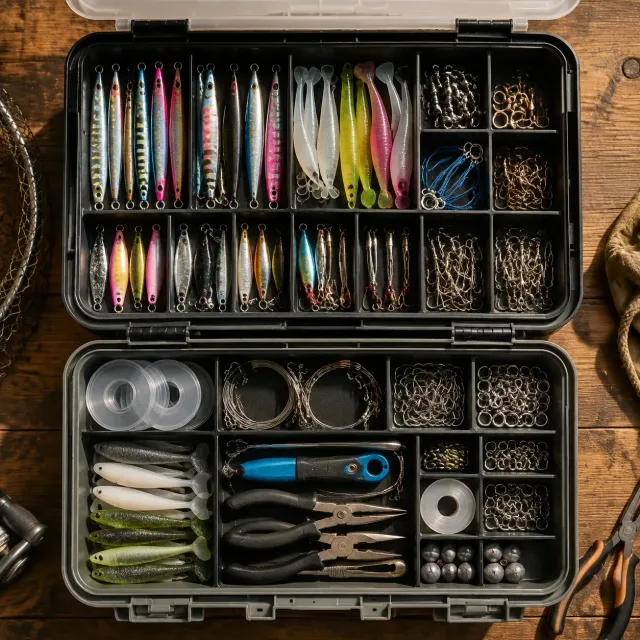
A good tackle box organization system makes every item easy to identify, keeps sharp hooks contained, and separates moisture from gear that can rust or degrade. Start by carrying less: build a trip-specific selection of lures and terminal tackle, then give each category a consistent compartment or pouch.
The most reliable approach is to organize by how quickly you need an item and how much protection it needs. Frequently changed lures belong in clear, accessible compartments. Hooks, weights, leaders, and small parts need labeled divisions. Wet tools, used lures, and rain-soaked gear should be kept out of the dry storage system until they can be aired out.
Audit the Tackle You Carry
Empty the box before buying more organizers or moving dividers. An audit shows which items deserve dedicated space and which have been taking up room since last season.
Sort everything into a few working groups:
- Hard baits, including crankbaits, jerkbaits, topwaters, plugs, and metal jigs
- Soft plastics, grouped by style and size
- Terminal tackle, such as hooks, swivels, snaps, sinkers, jig heads, and beads
- Leaders, pre-rigged components, and line spools
- Tools, including pliers, cutters, hook removers, and line clippers
- Consumables, such as scent, soft-plastic repair materials, or spare batteries
- Damaged, duplicate, or no-longer-used items
Then ask three questions of each item: Do I use it on the water? Do I need it quickly? Can it damage, tangle with, or corrode nearby gear? The answers determine its storage location.
A lure that is changed repeatedly during a day should be in the top tray or most accessible utility box. A spare packet of hooks can live deeper in a bag. A bait with exposed trebles requires individual spacing or a dedicated compartment, even if it is not used often.
Remove empty packaging when it is no longer useful, but retain manufacturer labels for small terminal-tackle bags when the size, strength, or hook style matters. For retailers, distributors, and fishing-product buyers assembling display or field assortments, keeping the original identifying information with small components also reduces mix-ups between similar-looking SKUs.
Choose a Box Size and Layout
Choose storage based on the amount and shape of tackle you actually bring, not the maximum quantity a large box can hold. Overfilling a large box makes lure changes slower, while a box that is too small encourages loose hooks, crushed soft plastics, and gear stored in the wrong place.
A practical system often combines a main tackle bag or box with one or more removable utility boxes. The main carrier holds the day’s core selection and tools; removable boxes let you swap a bass setup, inshore assortment, or jig selection without rebuilding everything.
Match the layout to your fishing style
Shallow trays work well for low-profile terminal tackle and small hard baits. Deep compartments better suit tall plugs, larger jig heads, bulky packages, and tools. Adjustable dividers are useful when lure sizes vary, but fixed small divisions are often better for split rings, snaps, weights, and hook packets.
Consider these common layouts:
| Layout | Best for | Benefits | Watch for |
|---|---|---|---|
| Flat utility box with dividers | Hard baits, jigs, terminal tackle | Clear visibility and fast access | Dividers can shift if not secured |
| Double-layer box | Mixed lure and terminal setups | Separates categories without adding another case | Confirm compartment depth and closure design |
| Compact pocket box | Small kits, bank fishing, backup tackle | Low bulk and easy carry | Limited room for larger lures or tools |
| Tackle bag with removable boxes | Multiple techniques or longer trips | Flexible and easy to reconfigure | Can become heavy when fully loaded |
| Dedicated soft-plastic binder or bag | Packs of plastics and rigging parts | Helps preserve original packaging and shape | Not ideal for loose hard baits |
For a modular option, evaluate a double-layer lure box when you need separate storage levels for different lure groups or terminal components. Check the product page for the actual compartment arrangement, dimensions, and closure details before matching it to your lures.
Build around a realistic trip load
For a short outing, one compact box plus pliers and a small leader wallet may be enough. For a boat day with changing water conditions, carry a main assortment but still limit it to lures you can explain a purpose for. A full tackle room does not belong in every boat compartment.
Use a simple rule: each storage space should have a defined job. For example, one box might be “moving hard baits,” another “jigs and soft plastics,” and a smaller box “terminal tackle.” This prevents every box from becoming a miscellaneous collection.
Separate Wet and Dry Equipment
Moisture management is one of the most important parts of tackle box organization. Closing damp lures, wet leaders, or tools inside a sealed container can trap water against metal components. That increases the likelihood of corrosion and can leave odor, residue, or staining on adjacent tackle.
Keep two zones:
- Dry zone: New or fully dried lures, hooks, leaders, terminal tackle, and clean tools.
- Wet zone: Used lures, wet pliers, fish-handling tools, rain-soaked gear, and anything that needs attention after the trip.
A small open tray, mesh pouch, or clearly marked temporary container can serve as the wet zone while fishing. At the end of the day, remove lures from it, rinse equipment as appropriate for the water conditions and product guidance, dry it thoroughly, and return it to the organized dry box.
Do not store wet soft plastics with metal tackle
Soft-plastic baits can carry water, scent, oil, or color transfer. Store them in their original bags whenever possible, especially when different plastic formulas or colors are involved. A loose soft bait pressed against a hook, hard bait finish, or other plastics can create a mess that is harder to identify later.
Saltwater anglers should be especially disciplined about post-trip separation. Even tackle that looks dry may retain salt residue. Follow the care guidance supplied with the product, and make sure metal items are dry before closing them into long-term storage.
Desiccant packs can help reduce residual moisture in appropriate storage areas, but they are not a substitute for drying wet tackle. Replace or refresh them as directed, and keep them out of reach of children and pets.
Organize Lures by Type and Weight
Organize lures first by category, then by a characteristic that affects when you use them. For many anglers, that means weight, diving depth, profile, or color. The goal is to make selection quick without creating so many subgroups that every lure becomes difficult to find.
For metal jigs, arrange by weight from light to heavy. Put the printed or labeled weight where it can be read without removing each jig. If the lures are unlabeled, add a small, water-resistant label to the compartment rather than marking a finish that may wear.
For hard baits, group by type before color: keep crankbaits with crankbaits, topwaters with topwaters, and jerkbaits with jerkbaits. Within each compartment, place similar running depths or sizes together. This makes it easier to choose a lure based on water depth and presentation before narrowing down color.
For soft plastics, keep styles and sizes separated in their original packaging. A practical grouping might be:
- Craws, creatures, and compact trailers
- Worms and stick baits
- Swimbaits and paddletails
- Grubs and finesse plastics
- Large-profile plastics for heavier rigs
- Replacement tails or specialized components
Avoid forcing oversized hard lures into shallow compartments. Bent bills, compressed skirts, distorted soft plastics, and tangled trebles are signs that the layout is working against the tackle.
Use labels that support fast restocking
Labels should describe the contents, not merely the box number. “1/8-1/4 oz jig heads,” “topwater,” or “leader material” is more useful than “Box A.” For a retail or sourcing environment, include key distinctions that prevent handling errors, such as hook size range, lure weight group, or intended assortment segment.
Keep labels on the outside edge visible when boxes are stacked. Clear lids are helpful, but exterior labels still save time when several boxes hold similar gear.
Protect Hooks and Trebles
Hooks are the main source of tangled lures, damaged finishes, and hand injuries inside a tackle box. Give them controlled storage rather than treating them as loose hardware.
Single hooks, replacement trebles, and jig hooks should remain in their original packages or go into small, secure terminal-tackle compartments. Separate hook styles and sizes. A hook that looks close enough during a rushed re-rig can create an avoidable mismatch.
For hard baits with trebles, use one compartment per lure when possible. If a compartment must hold more than one bait, choose lures that fit without their hooks crossing. Hook bonnets or point covers can add protection, but they must be dry and correctly fitted; they do not solve a crowded storage layout.
Keep a small pair of pliers or a hook-removal tool accessible, not buried under lures. This is both a convenience and a safety decision. Check the tool’s locking mechanism and condition before carrying it loose in a bag pocket.
Common hook-storage mistakes include:
- Tossing used hooks back into a clean compartment
- Combining exposed trebles with soft-plastic packs
- Leaving rusted hooks with usable terminal tackle
- Packing lures so tightly that hooks snag the lid or divider
- Storing loose hooks in an unlatched pocket
Discard or isolate hooks that are visibly corroded, bent, dull, or otherwise no longer suitable for use. Do not let one damaged item contaminate a neatly organized supply.
Review Portability and Closure Details
A well-organized tackle box is only useful if it stays closed, fits the way you fish, and can be carried without becoming a burden. Before committing to a layout, review portability and closure details with the box loaded, not empty.
Check whether the box fits your tackle bag, boat compartment, vest pocket, kayak storage area, or bank-fishing pack. Consider the full packed weight, how easily it opens with wet hands, and whether its shape allows boxes to stack securely.
Closure quality matters because spilled terminal tackle is difficult to sort and can create a puncture hazard. Look for lids that close evenly, latches that engage securely, and dividers that do not allow small items to migrate between sections. Where product-specific details matter, confirm them on the product page rather than assuming all boxes use the same seal, latch, or divider system.
A compact lure storage box may suit a minimal kit or a specialized box for one lure family. Compare its listed capacity and compartment configuration against the actual lure lengths, hook profiles, and terminal-tackle packages you intend to carry.
Remember that a tightly closed box is not automatically waterproof. Unless a product page explicitly states a water-resistance or waterproofing claim, treat it as protective storage rather than a dry bag. Keep critical items dry through good packing habits and appropriate outer storage.
Compare Lure Storage Product Options
The right storage option depends on the tackle category, how often it is changed, and whether it needs protection from tangles or moisture. There is no single best lure box for every angler.
| Storage option | Strong fit | Less suitable for | Key buying checks |
|---|---|---|---|
| Adjustable compartment box | Mixed hard baits, jigs, sinkers, and accessories | Large quantities of packaged soft plastics | Divider security, compartment dimensions, latch design |
| Double-layer organizer | Separating frequently used lures from terminal tackle | Extra-long lures or bulky tools | Layer access, usable depth, loading orientation |
| Compact organizer | Small, focused selections and travel kits | All-day multi-technique assortments | Pocket or bag fit, compartment count, closure |
| Soft-plastic storage | Bagged plastics and rigging supplies | Loose trebled lures | Capacity for packages, support for flat storage |
| Tool pouch or sheath | Pliers, cutters, and hook tools | Loose hooks and small weights | Tool fit, drainage or drying needs, secure closure |
A buyer comparing assortment options should start with the items to be stored, not a catalog photo. Measure the longest lure, note the bulkiest package, identify the smallest parts likely to escape a divider, and decide whether the box will be carried alone or inside a larger system.
WKLURE lists lure storage alongside its fishing tackle offerings. Browse the tackle storage category to compare currently shown formats, then verify product-level specifications for fit, material details, and layout. For a wider planning pass, the full product range can help pair storage needs with the lure, hook, rod, or soft-plastic categories being considered.
Use a Final Organization Checklist
Before each trip, use this checklist to confirm the tackle box is ready:
- Carry only the lures and terminal tackle relevant to the planned water, species, and techniques.
- Keep high-use lures in the easiest-to-reach compartments.
- Separate hard baits, soft plastics, terminal tackle, and tools.
- Arrange jigs and similar lures by weight or another decision-making feature.
- Keep hooks in secure packages or dedicated small compartments.
- Check that treble hooks cannot cross into neighboring lures or snag the lid.
- Remove wet, dirty, or corroded tackle from dry storage.
- Confirm dividers are seated and latches close fully.
- Make sure the loaded box fits the bag, compartment, or carry setup.
- Restock used hooks, leaders, weights, and other small items after the trip.
The system should be easy to maintain. When a compartment becomes hard to close, a label stops matching its contents, or a lure change feels slow, reorganize that section before the next outing. Start with the storage format that fits your core assortment, then refine the layout based on what you reach for most.